Tuesday, September 24, 2013

CELEBRATING YEAR ROUND WITH, CARO'S CONFECTIONS.


  CELEBRATING AT A GLANCE!
        
    You know I never realized how rewarding it is to supply celebratory staples for families, friends and their loved ones. Year round celebrations of all types are happening, and with recommendations from the gift of word of mouth, Facebook, or my clients guest at their parties- It always still surprises me and thrills me when I get to do a new confection project for someone. You got to see some of my cakes and confections, from last Fall. Halloween weekend marked the beginning of rehearsals for musicals and filming for a few indie shorts I worked. Finding time to book clients wasn't easy, but was able to take on as many projects as I could. So here is a recap of some 2013 confections thus far.

JANUARY
  • "Captain America Suit" cake. I mostly enjoyed carving the abdominal area. Some even asked" If you are, what you eat- then can I eat those abs?" hahaha. 
  • "Bow-tastic" cake. Lots of curly ribbon, glittered confetti and of course a giant bow.
  • Macarons of all kinds.


 FEBRUARY
  • "Fireman Graduate" cake. Was honored to make this cake for our hero's of today.
  • More macarons, and even some lovely heart shaped shells for Valentine's Day.
  • "Valentine's Cakes for Two". My first bulk order of cakes. This was a monster project for me. Had over 25 orders. I learned a lot in this process. Thanks to my mother and sister. I survived!
  • "Hunger Games" cake. This was just fun. I'm really into any type of fantasy cake, it really is the most fun for me. This golden bird was done by hand, and felt really proud considering iI had no idea where to start with it. 
  • My mom helped finish off the flames as I built the golden topper.
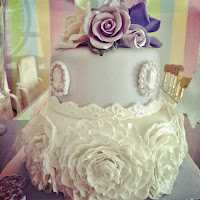
  • "Vintage Tea Party Birthday" cake. This was for my sisters 30th surprise birthday cake. That bottom tier took the longest, but fondant frilled like that, looks so lovely.


MARCH


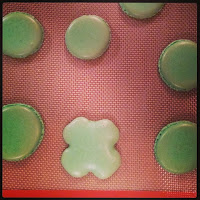
  • Macarons, yet again. Playing with the shamrock shape. 
  • "Golf Lover" cake. Simple, but still had enough detail. Loved the glittered flags.
  • "Circus Tent" cake. This was for an amazing charity called "Birthday Fairies", a friend of mine, Casey, created a branch here in South Florida, it's such a sweet story on how this amazing organization came about. For more info please click HERE
  • Here is a simple buttercream cake, adorned with mauve florals. I love florals with black centers, here we have , anemone's, and since this birthday lady is very chic, it was my go to color and flower!
  • "Safari Jungle" cake. This mother planned the sweetest first birthday for her son. She wanted buttercream for her guest and whatever fondant pieces for decor- so with that I went to town. I'm obsessed with these giraffes.
  • "Red Rose Flamenco" cake. This cake was for my dear friend's mother. The love of flamenco is vibrant in that house, and she wanted to make it extra special and personal. 


APRIL
  • "Christening" cake. I just got SugarVeil, and my client loves simplicity in a very classic way. She wanted all buttercream, white with just a hint of baby blue. To keep that delicate nature, I used the SugarVeil lightly and it had a very nice effect on the cake.
  • "Lace Crown" cake. This cake was for my niece's first birthday, it fell in the middle of the week and her actual party wasn't until the weekend. Though things were crazy, with all the last minute 'to do's' I was able to whip up a mini- cake for her and the parents. It's only tradition for a cake and candle on anyones birthday. 
  • "Circus Elephant" cake. So many types of circus animals to do, and even with an elephant I couldn't decide what to do. Sometimes, you just have to trust yourself and see what comes out! All I know, is I wanted big floppy ears, and this lil girl had em.
  • "Circus Cupcakes". We did 'popcorn','sundae', milkshakes, and randoms.
  • "Taurus Brownie" cake. I don't get this, explain to me the person (in this case a guy) that prefers vanilla on vanilla cake, BUT loves CHOCOLATE? lol. Gotta love 'em. Brownie cakes have become popular orders for me since then!
  • "PINK-GREY" Wedding Cake. This simply yet floral time consuming cake, was used for a " PINK GREY VINTAGE CHIC" wedding photo shoot, that I was very happy to be a part of  by, Liz Dikinson Photography. It was later published in several bloodspots and magazine articles (more on that later). 


MAY

  • "Burlesque" cake. This bachelorette party had a spicy theme for their ladies night out, and I was all game. I prefer this kind of cake versus the raunchy, well- you know...
  • Lots of desserts for treats tables, cupcakes, tea cakes of all flavors. have you seen my menu? Click HERE
  • "Betty Boop Kisses" cake. This client had their very own Betty Boop topper, and wanted a complimenting cake for it. Check out these sweet kisses.
  • "Lady Bug" cake. The most important and hardest decision for me, was her face. She is indeed a, lady.
  • "Vintage Tea Bridal Shower" cake. the setting once again compliments the cake. I really enjoy this life sized dollhouse. For more info on Veronica's Dollhouse, click HERE.


JUNE
  • Could not book clients due to back to back 'LOCAL & OUT OF TOWN' show runs until mid August.
   AUGUST
  • "Superman" cake. This adorable 4 year old the coolest invites!!!
  • "Dad" cake. I call these the "Dad" simply because it was for my father, and he loves a classic vanilla bean cake with chocolate add ons anywhere. So before I headed off to rehearsal, I whipped up a 'Judy Garland' cake with on add on of chocolate morsels and milk chocolate ganache. With a simple banner and candles, it was there waiting for him. Don't worry there was a piece waiting for me when I got home. ;)


SEPTEMBER
  • " Rustic Baby Shower" cakes. Oh, yeah by the way my sister is expecting! This time a baby boy. So many events happen before fall, that it's crazy to think you will every get anything done!  Somehow, some way between my sisters work, m


       Hope you all enjoyed some of my confections from this past year. Looking forward to many, many more. Stay tuned for post on my recent dessert tables and treats provided for my clients, also tips on how to prepare and decorate dessert tables, until then...

Pinkies Up,

    Caro


Tuesday, September 17, 2013

MACARONS AND A SPOT OF TEA VOL.III (Macaron Making)


Spiced Macarons shells. Filling: pumpkin spice buttercream,
salted caramel buttercream, dark chocolate ganache, and fig preserves.

FUN FACT: This blog officially turned 1 years old on, Sept. 7th!        
After many requests, and also attempting a successful Skype session with a woman in Jamaica (more on that later), I've finally have made the time to post about making the infamous 'Macarons'. Considering it's been a year since I started this blog, and since my first post was all about these yummy parisian cookies, I figured it was the right thing to do- and for all my friends who kept coming back with the same questions-- this could be a great 'cheat sheet' while they bake at home.


So without further adieu: Macarons and A Spot of Tea Vol.III (MACARON MAKING)

The process of the 'French Meringue Macaron' shell.
(makes about 50/60 shells, for 25 to 30 filled macarons)

You will need (Ingredients):

  • 2 3/4 cups of almond flour
  • 2 3/4 cups of confectioners sugar (powdered/icing sugar)
  • 1 cup of egg whites (7 to 8 eggs) at room temperature
  • pinch of salt
  • 3/4 cups of superfine granulated sugar (cane sugar)
  • Optional: 2 teaspoons of powdered egg whites (for humid weather), food coloring ( I prefer gel or powdered color), extracts, spices.


Tools:
  • Baking sheets/trays, lined with parchment paper, or silicone mats.
  • Electric hand mixer or stand alone mixer (whichever you have).
  • Large piping bags (don't have? try using a large zip-lock bag)
  • Round Piping tip, Number 8 (3/8th size)
  • Deep bowl for mixing wet ingredients 
  • Bowl for dry ingredients (I use a nice wide round bowl when I fold both wet a dry ingredients together, it's easier for me)


OVEN Temperature:
300'F/ 148'C (Convection Oven or setting for 'Convection Bake')
325'F/ 162'C (Non-Convection Oven)

For smooth coasting, BEFORE WE BAKE... (step by step)
  1. (PART1)-Crack, and separate all of the egg whites (you could save the yolks for fillings). Whatever bowl, glass, container you use make sure it is extremely clean, any foreign residue can possibly ruin this process. Cover your egg whites and allow them to come to room temperature. 
  2. -Next, have your bowl for dried ingredients and sifter ready. With your sifter over the bowl, previously measured powdered sugar and almond flour, begin to sift the ingredients together adding equal amounts of each at the same time until all has been passed through. Some like to run the two ingredients through the sifter once more, some even put it through the food processor to get the mixture extra fine. I'll be honest- I have never had to do that! Just be sure to discard any big pieces of almond flour that doesn't go through the sifter. This is really important so you can really get a lovely smooth shell top!
  3. - Now it's time to bring those ROOM TEMPERATURE egg whites back in! Have them ready in the bowl you will be using with your,  electric hand or stand alone mixer.
  4. -Have ready your caster sugar, salt, optional: food coloring, powdered egg whites, and/or extracts.
  5. - With your electric mixer begin beating the eggs, until they become frothy. 
  6. -At the frothy stage take your salt and powdered egg whites (if you choose to use it) and add them in, continue to mix and beat the eggs.
  7. -As the frothy mixture becomes a little bit thicker, add in the granulated sugar, continue to beat, and then add in the food coloring and any flavor extracts (if you plan on using them, little goes a long way).
  8. -Now the eggs are becoming more of that glossy meringue mixture, that you are used to seeing. Some like to beat the eggs until they are stiff peaks, I usually stop mine right before that stiff peak happens. The stage in which they will be holding a bec d'oiseau, or "bird's beak". With your spatula, scoop up a bit of mixture and if it droops to form that "birds beak" but firm enough to stay on your spatula and not slide off-- YOU ARE IN GREAT SHAPE AND READY FOR THE NEXT STEP!
  9. - Time to do the Macaronner! No i did not make that up, and yes this term exists, LOL. The French use this term to describe the physical motion of  mixing in your wet and dry ingredients together.  It's best to do this by hand- don't use your electric mixture. You will have much better control of your batter without over beating the eggs once more!
  10. - Have both bowls and spatula ready. The reason why I use a large wide bowl for my dry ingredients is so I can fold and mix the wet ingredients properly. 
  11. -Add the beaten egg whites directly on top of the dry mixture, begin to fold them in.
  12. -As mixture both mixtures become one, begin to press the batter against the bowl- as if you are coating the bowl. This really helps with mixing properly, some even hit the batter against the walls of the bowl (this is good for getting any air out too). Now to test if everything has been properly missed, with your spatula scoop up a good amount and allow it to fall. When  you cant notice and crumbs, and the mixture is shiny, flowing, and smooth -YOU ARE READY TO START PIPING!
  13. -With lined baking sheets, and piping bags with their proper piping tips ready to go, be sure that you have a handy timer and oven set at the corresponding temperature depending on convection or non convection oven.
  1. (PART2)-How often do you pipe? If you find it difficult to fill at times, helpful tip, when filling a piping bag; find a tall glass or container that you can put the piping bag in (the taller the better). Fold over an inch of the bag around the rim as an anchor. It becomes your very own assistant in the kitchen
  2. -Piping macarons, evenly on your parchment paper or silicon mats, can sometimes be finicky. Over time I promise it gets easier to eyeball it. If you want a guideline, the easiest thing to do is draw and  evenly space out 2-inch diameter circles on parchment paper, flip the sheet over face down on the baking sheets and you have rows of beautiful circles ready to be filled.
  3. - PIPE AWAY!
  4. Now you have piped away several rows of macarons. One of the most important things you must do after each baking sheet is filled, is with a hand at each end of the sheet, lift your baking trays a few inches from the kitchen counter and other flat surface and SLAM the tray down. DO THIS TWICE. This helps prevent any trapped air bubbles (that could form cracks on the tops of your shell during the baking portion- we don't want those).
  5. Now don't put them in the oven, just yet. With your handy dandy timer set it for 20 minutes (you could do 15, but lets play it save). You will notice the circles of batter to spread thin a tad and also have a thin dry coat. This is an important process prior to baking the shells. It helps to create well formed pieds, or "feet". If the 20 minutes are up and you notice (by carefully tapping one of your piped circles) that the batter hasn't created a dried coating, you are not ready to put them in (add another 5 minutes and so on.)! Please be sure it is cool in your house, that the humidity has not entered your kitchen. The young lady I helped, from Jamaica (via Skype), had this problem. Do you know what finally worked? A BLOW DRYER ON COOL SETTING!!! HOW CRAZY?!? With that she was able to get that coat and then the adorable feet that followed!  Ok, ok, moving on if you have achieved that dry coat! *On a side note, while they are setting before the baking happens, this would be a good time to have your filling ready for the cookies! (post on macaron fillings coming soon!)
  6. Carefully place the trays in the oven, set that timer for 14 minutes. Stand by and get ready to pull them out! Please note that everyones kitchen is different, sometimes baking at friends places, I've noticed I've had to put them in for only 13 min, sometimes 15 min. Feel free to try a test on a separate tray, before you put your whole trays in (it's ok to leave everything piped and ready to go as you test times, gives the piped macs more time to set!). Done testing? Goal: you want smooth round shell, enough crisp on the outside, but chewy full centers, with well formed pieds, or "feet". Finish off the baking!

       
  1. (PART3)-Now the baking is finished and these babies have to cool. In the mean time you can be finishing up any fillings you picked, and pack them in piping bags for easy dispensing for filling the shells!
  2. Before filling, be sure to get all your shells lined up and ready. Make sure you have matched the shells to the best of your ability... almost there!
  3. With your piping bag of preferred filling, pipe out a dollop size amount (quarter size works for me).
  4. With your filled macarons, and with time to spare, pack them carefully in a tightly sealed container. I like lining my tupperware with paper towels and sealing them in there. I then put them in the refrigerator atleast 6 to 8 hours- or over night. This gives the filling the chance to really do it's job in the aromatic department. Especially when making macarons with spiced or herbed enrichment shells and fillings! If you aren't planning on eating them the next couple of days. FREEZE THEM. 
  5. Last and final step..... EAT EAT EAT, with cup of tea, coffee, or for that special occasion - some BUBBLY!
       I WISH YOU THE BEST ON YOUR NEXT MACARON ADVENTURE!

Any questions left unanswered? Let me know! Still having trouble with the process, share with me! Need to do a side by side tutorial? Lets Skype! I'm here to help.


Photo Credit:  Babette Photography
 For my next post about macarons, I'll be talking more about the fillings, along with using the shells to decorate cakes and my favorite- MACARON TOWERS! Notice the pick to your left, the macaron tower, surrounded by macarons, cookies, chocolates, and other goodies. This was a dessert table I did for a winter wedding. Be on the look out for my post of dessert tables and a recap on the celebrations that took place this past year!


Pinkies Up,

      Caro

P.S. Want to get inspired and not sure where to start? Check out my post about, BOOKS, that inspire me. Live in Miami? Check out my favorite MIA MACARON carriers, HERE and HERE. Live in NYC? Check out my favorites, HERE. ENJOY, CHEERS- PROST- ZALUTE.